Workspace
AKVIS MakeUp can work independently as a standalone program as well as a plugin to a photo editor.
- Standalone is an independent program; you can open it by clicking on the program's icon.
To launch the standalone version, run the program directly:
On a Windows computer - select it from the Start menu or use the program's shortcut.
On a Mac computer - launch the app from the Application folder.
- Plugin is an add-on for a photo editor, for example for Photoshop.
To call the plugin, select it from filters of your image editing program.
The workspace will be arranged according to the interface mode chosen in the Control Panel: Express, Advanced, or Presets.
The first time you run the program, it is displayed in Express mode, with a simplified interface and a minimal set of sliders, which help to quickly obtain a satisfactory result.
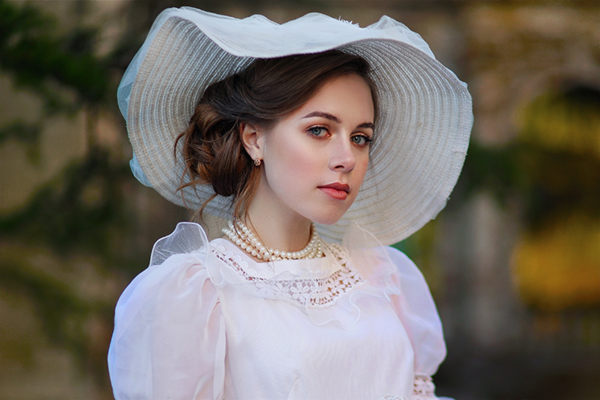
AKVIS Makeup gives your portrait photos a professional look by automatically smoothing small defects on skin, creating a radiant, pure, and even effect! Thanks to AKVIS Makeup, all of your subjects will have perfect complexion, giving your entire portfolio a makeover! AKVIS MakeUp improves your portraits giving them a professional look. It retouches facial imperfections making your skin radiant, beautiful, pure, and even. Its Spot Remover tool removes small imperfections and 'heals' skin problems; just click with the tool on the defect to remove it.
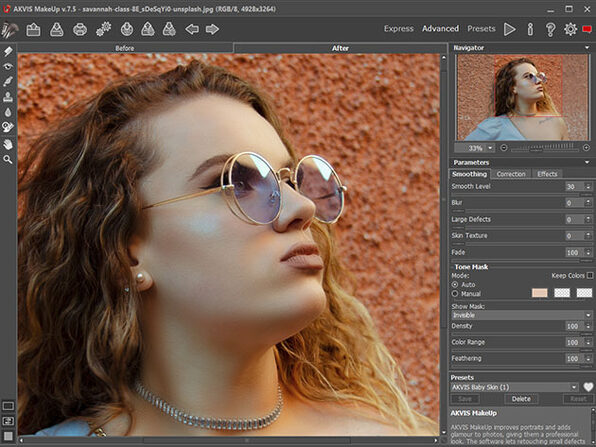
Workspace of AKVIS MakeUp (Express)
Experienced users who are familiar with the capabilities of AKVIS MakeUp can switch to Advanced mode: the interface's appearance will change, granting access to the full functionality of the program.
Note: All features and parameters work in Express mode as well; some are hidden and the program uses values of a chosen preset.
The Presets button in the top panel allows you to switch to the visual display mode of presets (Presets Gallery).
Workspace of AKVIS MakeUp (Presets Gallery)
The left part of the program's window is taken by the Image Window with two tabs - Before and After. The Before tab shows the original image, the After tab shows the result. To switch between the tabs and compare the original and the resulting images, just left-click on any point of the image.
Keep in mind that once the After tab is pressed, the entire image will be processed automatically.

You can select how Image Window and Before/After tabs will be shown by adjusting the View Modes in the bottom part of the left panel.
In the upper part of the program's window you can see the Control Panel with the following buttons:
- The button opens the home page of AKVIS MakeUp.
- The button (only in the standalone version) opens an image for processing. Right mouse click on this button displays the list of recent files. You can change the number of recent documents in the Preferences dialog box.
The hot-keys are Ctrl+O on Windows, ⌘+O on Mac.
- The button (only in the standalone version) saves image to the disk. The hot-keys are Ctrl+S on Windows, ⌘+S on Mac.
- The button (only in the standalone version) prints the image. The hot-keys are Ctrl+P on Windows, ⌘+P on Mac.
- The button (only in the standalone version) opens the Batch Processing dialog to automatically process a series of images.
- The button lets posting pictures from the program to the social networks.
- The button imports a list of user presets (from the .makeup file).
- The button exports user presets. You can save any presets to a .makeup file.
- The button cancels the last operation made with the tools. It is possible to cancel several operations in a row. The hotkeys are Ctrl+Z, on Windows, ⌘+Z on Mac.
- The button returns the last cancelled operation. It is possible to return several operations in a row. The hotkeys are Ctrl+Y on Windows, ⌘+Y on Mac.
- The button starts image processing. The result is shown in the After tab.
- The button (only in the plugin version) applies the result to the image and closes the plugin.
- The button calls information about the program.
- The button calls the Help files. The hot-key is F1.
- The button calls the Preferences dialog box for changing the program's options.
- The button opens a window showing the latest news about MakeUp.
Тo the left of the Image Window there is the Toolbar. Different tools will appear, depending on the workspace mode Express/Advanced chosen. The tools' parameters are shown in the Settings Panel and in a pop-up box after right-clicking in the image window.

Pre-Processing Tools (in the Before tab):
- The button switches on/off the Quick Preview area (more…).

Akvis Makeup Free Download
Mask Correction Tools (available for Home Deluxe and Business licenses):
- The button activates the Keep Area tool which adds fragments to the tone mask.
- The button activates the Drop Area tool which removes fragments from the tone mask.
- The button activates the Eraser which removes the manual corrections made in the mask, returning to its original form (the auto-mask).
Retouching (Post-Processing) Tools (available in the After tab):
- Attention! If you switch to the Before tab, adjust the parameters and run the image processing again , the changes made with these tools will be cancelled; but they can be restored with the successive use of .
You can use these retouching tools:
- The button activates the Teeth Whitening tool.
- The button activates the Red Eye Removal tool.
- The button activates the Spot Remover tool which removes small imperfections on an image: stains, dust, etc. You can also use it to retouch portraits. It can 'heal' skin problems. Just click with the tool on the defect.
- The button activates the Chameleon Brush tool.
- The button activates the Blur tool which reduces image sharpness by decreasing color contrast between neighboring pixels.
- The button activates the History Brush tool which restores areas to their original state. It lets you edit the result without correcting a mask.

Additional Tools:
- The button (only in the standalone version) activates the Crop tool which allows cutting off unwanted areas in the image.
- The button activates the Hand tool which allows you to scroll the image when it does not fit within Image Window at the desired scale. To use it click on the button, bring the cursor over the image, and while keeping the left mouse button pressed move in the desired direction.
Double-clicking on the tool's icon on the Toolbar makes the image fit the Image Window. - The button activates the Zoom tool, which changes the image's scale. To zoom in left click on the image. To zoom out left click with Alt on the image. Press Z to quickly access the tool.
Double-clicking on the tool's icon on the Toolbar makes the image scale to 100% (actual size).
On the right side of the program's window you can see these sections: Navigator; Parameters; Hints.
Akvis Makeup Crack
You can hide/show a section by clicking on its title.
Navigate and scale the image using the Navigator. The frame in the Navigator surrounds the area of the image which is visible in the Image Window; the area outside of the frame will be shaded. The frame can be dragged, thereby changing the visible portion of the image. To move the frame, place the cursor within it, left click the mouse, and then drag.
Additionally, you can move the image in the Image Window with the scroll bars or by holding down the space bar, then holding down the left mouse button while moving the mouse. The mouse's scroll wheel can move the image up and down, and holding Ctrl (⌘ in Mac) – while using the scroll wheel will move the image left and right. Holding Alt (Option in Mac) will scale the image. Right-click on the scroll bar to activate the quick navigation menu.
Use the slider or the buttons and to scale the image in the Image Window. When you click on the button or move the slider to the right, the image scale increases. When you click on the button or move the slider to the left, the image scale reduces.
You can also change the image scale by entering a new coefficient into the scale field. Frequently used scale coefficients can be found in a drop-down menu.
You can use hot-keys to change the image scale + and Ctrl++ (⌘++ in Mac) to increase the image scale and - and Ctrl+- (⌘+- in Mac) to reduce the scale.
On the right side, there is the Settings Panel with the image processing parameters grouped into three tabs: Smoothing, Correction, and Effects; and the list of the Presets for these settings. Below there are the options for the selected tool.
In the bottom part you can see Hints for the parameters and buttons when you hover over them with the cursor.
MakeUp v. 7.7 - Free 10-day Trial


